|
Color rendition of five lenses in a digital system.
You are the visitor number 16646
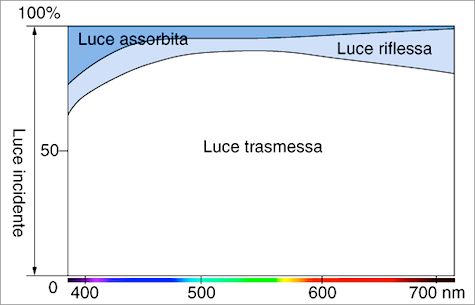
1. Introduction The color rendition is an important characteristic of a lens. Often photographers complain about changes in color reproduction after replacing the lens, especially those photographers who capture the same scene with a certain frequency. The color rendition of a lens depends on the interactions of the different elements that compose the lens with the light. The interactions are of two types, absorption and reflection. These effects create non-uniform attenuation of the spectrum that passes throughout the lens and creating in this way the color cast. Technically the spectral transmittance is the sum of the absorption and reflection. Below, a chart of Canon quantifies the light absorbed and reflected at different wavelengths on a non-specified lens. The spectral transmittance curve delimits the upper bound of the white area of the light transmitted. This chart shows how the attenuation of the spectrum is more pronounced in short wavelengths than in the medium-long ones, so this lens produces a yellow cast. The extreme left of the graph quantifies a percentage of loss of light close to 40% (!).
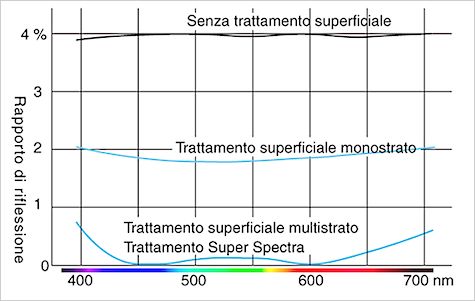
Manufacturers can reduce these phenomenon by applying extremely thin films on the lens surface, the coating. These coatings improve light transmission, optimize the color rendition and minimize various side effects, such as the flare effect and ghost image. Below, another graph by Canon shows the Super Spectra Coating treatment applied to a lens. From this we can notice the drastic reduction of the reflections and the optimization of the curve along the spectrum.
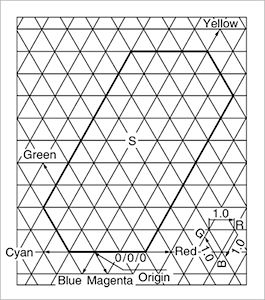
2. Standard reference and the evolution In 1983, the International Organization for Standardization ISO in the standard 6728:1983 "Determination of ISO colour contribution index (ISO/CCI)" has set the references for lenses manufacturers and designers of color film. ISO has averaged the spectral transmittances of 57 lenses of high quality from various manufacturers and has determined the characteristics of light transmission of the standard ISO lens. Then, ISO averaged the spectral data of many color films and determinated the standard ISO color film. With these data it introduced a method to translate the spectral reflectance of a lens into only three numbers that indicate the effect of the lens on the blue, green and red layers of the standard film in daylight at 5.500K. These number describe the color contribution of the lens on a standard color film, so this contribution was named Colour Contribution Index (CCI). The ISO standard lens has a CCI of 0/5/4. This means that on the standard film in daylight arrive more red (4) and green (5) light, than blue (0), so the ISO standard lens has "the right degree" of yellow cast. The latter part of the standard sets the tolerances allowed to manufacturers in order to define a lens as neutral. The graph below shows in bold the range of tolerances allowed by ISO represented on the CCI coordinates graph.
On the Net I have not found a lot on policy of manufacturers on compliance with ISO recommendations. In Sigma I have not found anything except some timid hints advertising. Even Nikon merely advertises the superb color reproduction of its lenses given by the high quality anti-reflection Super Integrated Coating (SIC). Canon instead in a lot of white papers recalls the ISO recommendations and declares to subject its products to quality controls of color balance and to keep all the tolerance intervals less than those allowed by ISO. In some cases it states that CCI values practically coincide with the lens of ISO reference. Leica instead publishes the CCI indexes of several lenses of the M series. Since the introduction of the ISO standard, times have greatly changed. All the standard is based on the film, but now the digital system has replaced most traditional systems, and digital makes things different. In fact, the final color of an image does not depend only on the individual factors in the acquisition phase, but the same data generated by the sensor can be processed in a completely different way. The image editing allows operations previously unthinkable. One of them is the adaptation to the scene light conditions simply moving a cursor in a software (white balance), and this may be done after the shot. The only adaptation solution with the film was the change in the type of film before shooting and the choice was very limited, or using tricks like filters to correct the color temperature of the light.
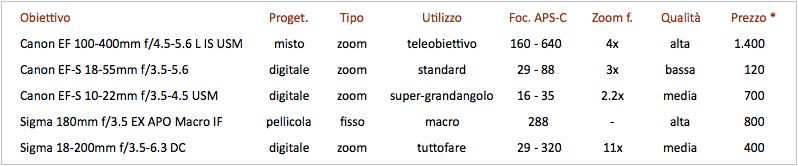
3. My test Up to now I am not aware of study done on the influence of the lens in a digital system. In this article I try to isolate and quantify the color contribution of five lenses on my digital system (Canon EOS 40D). Then, through a simulation, I will assess the color contribution of those lenses in a film. In both cases the color contributions will be weighed according to the characteristics of discernment of the human vision system in order to give them their proper value from the practical point of view. For the test I used five lenses very far apart for the design, type, usage, quality and price:
As reported in the table, two lenses have been designed for film and, although one was later adapted to digital, both must maintain transmissible characteristics compatible with the film systems. The other three lenses were born only for the digital system and this could have led manufacturers to develop new transmission features better suited to digital, leaving the ISO recommendations. The test in brief:
4. The color formation in digital and in film system Leaving aside by now the film system, the magnitude that describe the factors that influence the formation of color in digital systems are: In acquisition:
In post-production:
The diagram below illustrates the factors and their influence on the five final images.
5. The proof in detail Following the diagram, we enter into the details of the test:
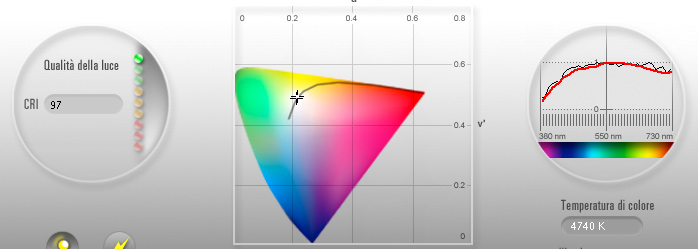
Both SoLux Daylight 4700K halogen lamps were arranged as to illuminate uniformly the foothold of the target. The lamps were connected to an adjustable power supply voltage. After placing the spectrometer EyeOne Pro on foothold of the target, I set the voltage so that the spectral power distribution of the source was as close as possible to the reference standard illuminant D50: the index color rendering (CRI) of 97 is calculated by I1share at a correlated color temperature of 4740 Kelvin. This is the comparison:
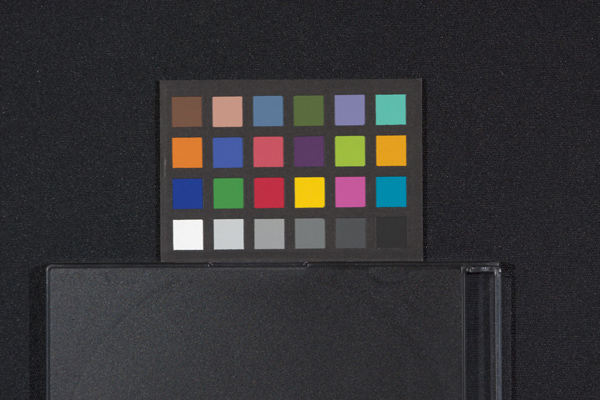
Controlling the camera from the laptop, I set the exposure value EV (aperture + shutter time + ISO) so that the white patch of ColorChecker in ACR was as close as possible to RGB Prophoto 245. All five white patches fall into a range of 8 units RGB (less than a third of a stop). Below one of the captured images.
It is the unknown magnitude I repeated the capture of the target by replacing the five lenses without moving the tripod not to change the point of view.
I measured by the spectrophotometer Eye One Pro the spectral reflectance of the patches of my mini ColorChecker. Then with the X-Rite Profile Maker 5 I combined together the data of my ColorChecker, those of the light source and the standard observer CIE 1931, obtaining the theoretical color coordinates of the target in the CIE Lab and RGB Prophoto color space. These values are used respectively for subsequent colorimetric comparisons and to customize the calibration script used during the test.
The spectral sensitivity of the sensor determines its response to the different wavelengths that reach it. The sensor generates RGB values that are recorded in the raw files without any modification. The raw converter extracts the data from raw files and converts them into an image. The parameters settings in the raw converter determinates the appearance and colorimetric values of the final image. In the test I used Adobe Camera Raw (ACR). To limit the variables involved, when I opened the images in ACR, I've set all fields in all tabs to zero and the curves on linear. In this way, only the six controls used later will have an influence during the conversion of raw files.
I created the dual illuminant DNG camera profile following the method described in the previous article with the image taken from the Canon 100-400mm and the Lab theoretical color coordinates of the ColorChecker. The accuracy of the created profile takes the patches of the image at a average distance DeltaE 2000 of 0.8 and a maximum of 1.7 by the theoretical colorimetric coordinates. In ACR, I have replaced the profile of the camera proposed by default with this profile.
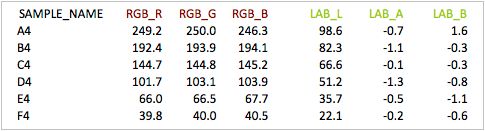
The white balance (Temperature and Tint) permits to balance the color temperature of the light in order to correct color casts that are created by capturing a scene with erroneous balance settings. Besides balancing the light conditions, it also balances the color shift caused by the transmission characteristics of the lens. In the test the balance corrects color casts by making the gray row neutral, or rather, since the gray patches of the ColorChecker are not perfectly neutral, the balance approximate the chromaticity of the patches on the chromaticity of the gray patches of the theoretical target. Below you can see the color coordinates of the grays of my mini ColorChecker.
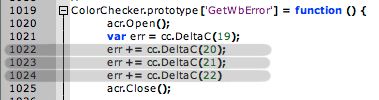
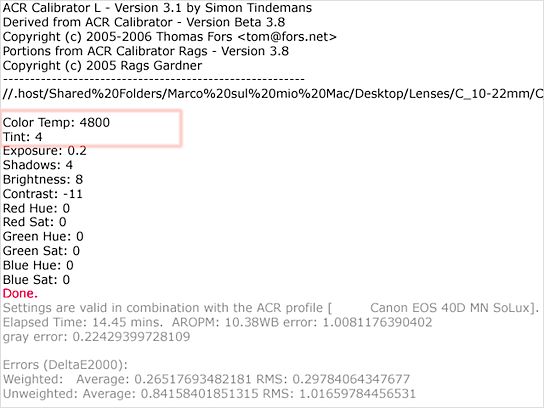
To calculate the white balance I used the calibration script ACR Calibrator L v3.1 by Simon Tindemans. Calibration scripts are small programs that run in PS and look for the best conversion parameters according to the instructions provided them through the interface or through directly customization by ExtendedScript Toolkit Adobe (installed with PS). To achieve a more consistent balance throughout the gray line, I invited the author of the script to implement a function that would allow to calculate the balance not based only on the second patch, but considering the four central patches of the line. Below I report his kind response: simply open the script with ExtendedScript Toolkit and add the lines highlighted below:
Below, the settings calculated by the Tindemans script for images:
In this test, the editing has two specific aims: to compensate the minimal exposure differences in acquisition and to force the tone curve of ACR to adapt to the limited dynamic range of the ColorChecker. So the editing have to bring the values of lightness of the images gray patches close to those of the theoretical target. If the exposure and the editing will offset themselves, their sum is a constant in all five images. To calculate the lightness of the gray patches I used the script calibration of ACR_Calibrator_CC24 Rags Gardner. The use of this script starts from the fact that the white patch of ColorChecker is very bright and unlikely that captured are closer to the theoretical value; the final distance between the two patches depends on the exposure used in acquisition and on the position of the slider Exposure in ACR; Rags script allows you to manually set the Exposure slider in ACR and to ensure that the cursor is not manipulated by the script during its run. In this way, the lightness of the white patches of the five images have the same distance from the lightness of the theoretical white patch and the other five patches coincide with the brightness of those theoretical . Below, the settings of the three sliders calculated by ACR_Calibrator_CC24 for the image of Sigma superzoom.
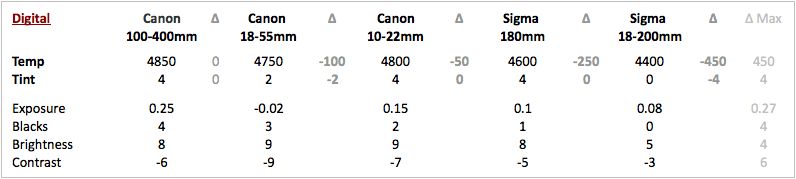
6. The final parameter conversion Below I report the conversion parameters that offer the best balance and normalization of the five images:
We note the first interesting things:
7. The method of comparison With the images balanced and normalized, it seems to open more strategies for comparison: compare the five images with the ideal target, take one as a reference and compare it with the other four, making cross-checks, etc. I chose the method that derives from this equation: I created the profile of the camera with the image of the Canon 100-400mm and the colorimetric coordinates of the theoretical target in Lab, then by definition:
replacing the lens added a new variable
if A = B, and A = C then B = C
reversing the terms
Then testing directly the differences between the image of the Canon 100-400mm and the others, we can isolate the lens variable. 8. Color contribution of lenses on the digital system Formulas that are designed to give a perceptual weight to color differences are the CIE formulas deltaE. The latest revision of the formula is the DeltaE 2000 that I used for comparison in the freeware ColoLab of X-Rite. PS: to adapt the format of the images to software, I used the script Read_Colors_CC24 by Rags Gardner. You can activate an option in the script and the script averages the center of each patch and picks up from those areas the 24 pixels to create a new image of the ColorChecker. Opening the script with ExtendedScript Toolkit at line 75 there is the variable which activates the procedure implemented by Rags Gardner in his script:
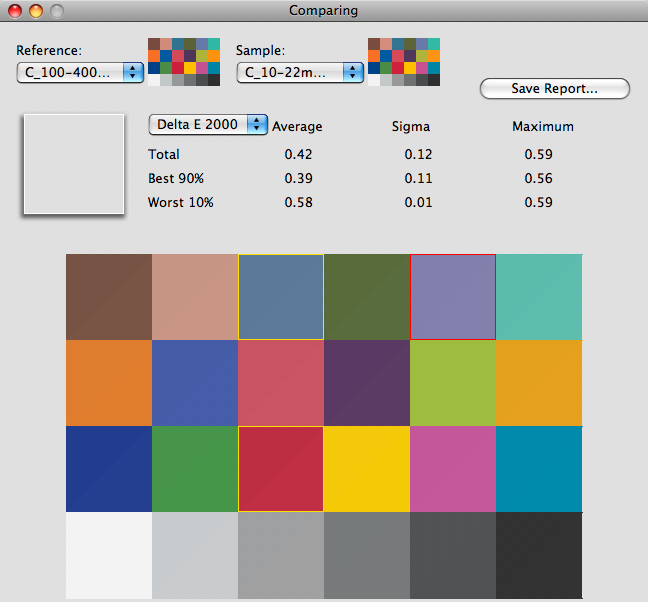
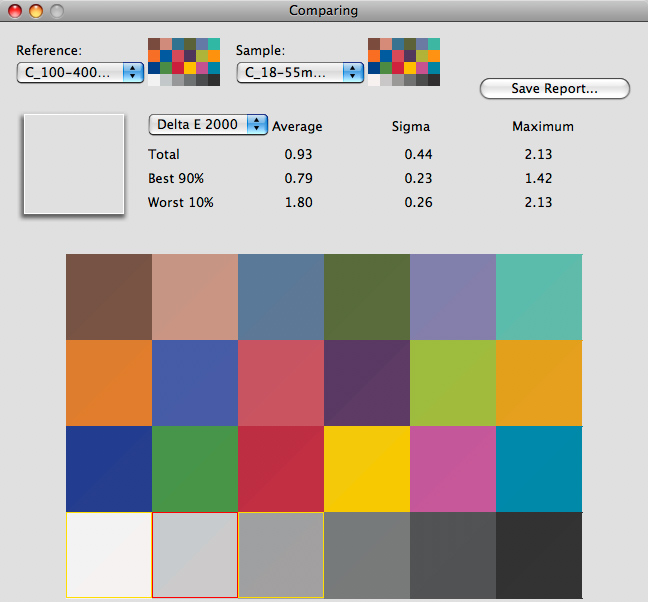
I have saved the Prophoto 16 bit RGB files, I have open them in ColorLab, converted them to Lab mode and compare. The results:
Summarize:
These DeltaE 2000 values are very low and indicate color differences much below the threshold of perception of the human eye.
9. Simulation of the color contribution on a film We consider again the diagram of factors that influence the formation of color and we take into consideration the traditional system:
Even in film systems we can talk about white balance, but with fixed values imposed by the manufacturer. The two common cases are the daylight films calibrated for daylight color temperature and electronic flash (5500K) and the ones calibrated for tungsten light sources.
Every film reacts to light according to spectral characteristics imposed by the manufacturer. It can be considered the same as the profile of the digital camera that converts the numerical data produced by the sensor into colorimetric coordinates.
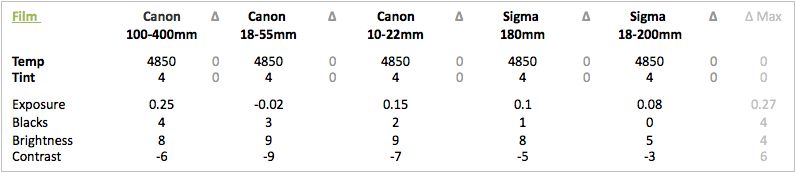
These are the chemical treatments that the manufacturer recommends for that type of film to obtain the yield colorimetric expected. It can be considered the same as digital editing, and in fact sometimes it is used to vary the final surrender of the film. The simulation of the analogue system is permitted by the fact that ideally the mentioned factors are constants, so with a color profile and the fixed white balance, I can simulate the entire process of color formation on a film. In the simulation I have taken the balance of the image of the Canon 100-400mm (4850K) and as color profile my customized DNG profile. With this preamble I simulate the formation of the colors on a daylight film designed with faithful intents to the scene. Having removed the capability of the system to adapt to the displacement of chromaticity introduced by the lens, these colorimetric analysis will show the actual weight that the different characteristics of light transmission of lenses leads to a system. Conversion settings:
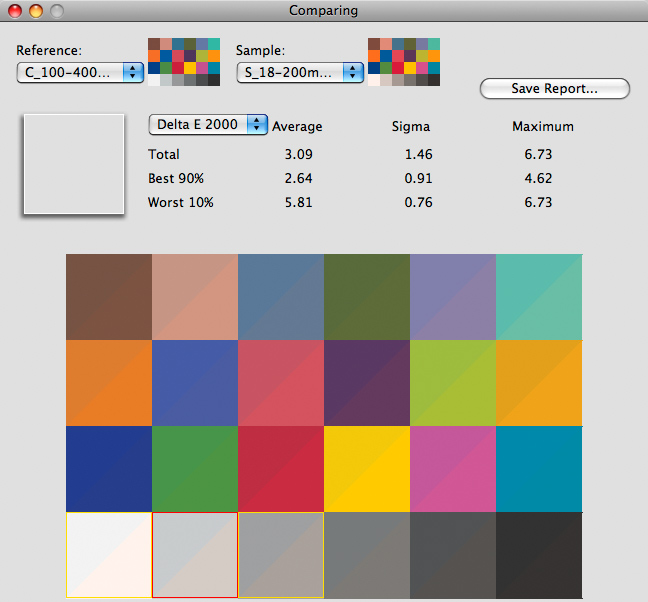
The results:
Summarize:
10. The test with a ICC profile Dual illuminant DNG profiles (as used in the test) contain two matrices of characterization that describe the behavior of the camera in two different lighting conditions (usually at 2856 K and 6500 K). Starting from these two matrices, ACR calculates the profile to assign to each raw image by an interpolation dictated by the temperature set by the user. During the test I had a doubt: the 450 Kelvin of temperature difference with two lenses, has affect the test? Then I repeated the test with the two lenses using a single illuminant profile which by nature is a constant. Here it has presented the possibility of using a single illuminant DNG profile or an ICC profile. I chose the ICC profile and DCRaw, so I can verify the results obtained with ACR with another raw converter. The conversion parameters passed to DCRaw set the gray balance throughout the entire line, normalizes the lightness of the white patches and produces two linear TIFF.
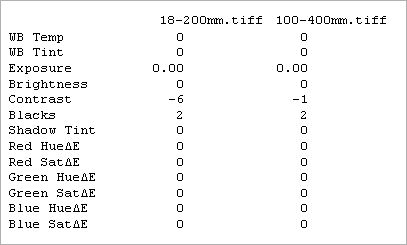
In Profile Maker 5 I created the ICC camera profile this time using the image of the Sigma 18-200mm. In Photoshop I gave this profile to both TIFF and I re-saved them. I opened the TIFFs in Photoshop via ACR and with the script ACR_Calibrator_CC24 I calculated the settings of Blacks, Brightness and Contrast that makes the lightness of gray images patches closer to that of theoretical ColorChecker. Below the setting calculated by the script.
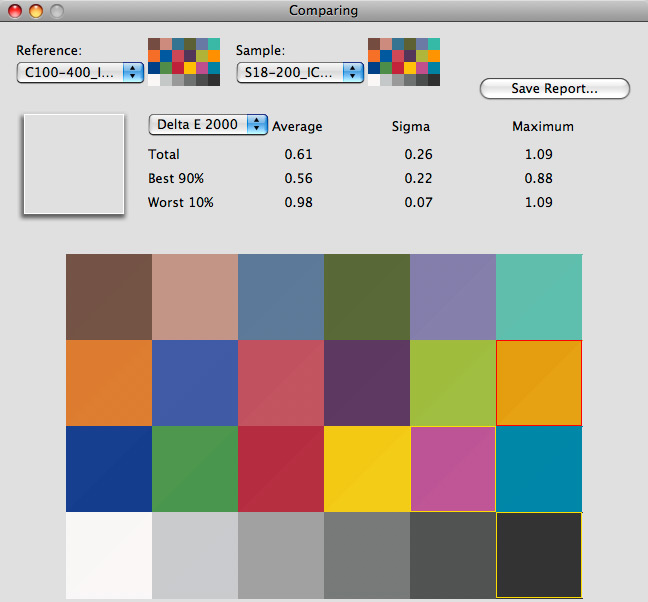
Applying these settings in ACR with Read_Colors_CC24 in Photoshop I created the 6x4 pixel RGB images for comparison and I saved them. I opened the two images in ColorLab, I converted to Lab and I compared them. As before, I repeated the same task but with fixed balance settings. Below the two results.
In both comparisons the values of DeltaE 2000 seem a copy of those seen with ACR: this is a confirmation of the validity of the method previously used.
11. Conclusions By colorimetric analysis I can say that::
© 2010 Marco Noldin - All rights reserved. |
|||