Sei il visitatore numero 25277
With Camera Raw 4.5 and Lightroom 2, Adobe has introduced a new type of camera profile, named DNG Camera Profile, together with a module for its editing, the DNG Profile Editor. Their combination offers opportunities unthinkable before. Adobe itself has given a trial providing a series of profiles which match the behavior of the camera software and proprietary raw converter. These profiles introduce a new concept of "look", opposed to the classical idea of camera profile. However, in this article I will review this classical idea discovering the possibility provided by the new solution. In fact my purpose is to create a profile that provide faithfulness to the scene in every standard lighting condition. I believe, for many reasons, that this is the first way to follow when we are not satisfied by the camera profile and before trying cosmetic editing. In the article I deal with Adobe Camera Raw but the same concepts are valid for Lightroom.
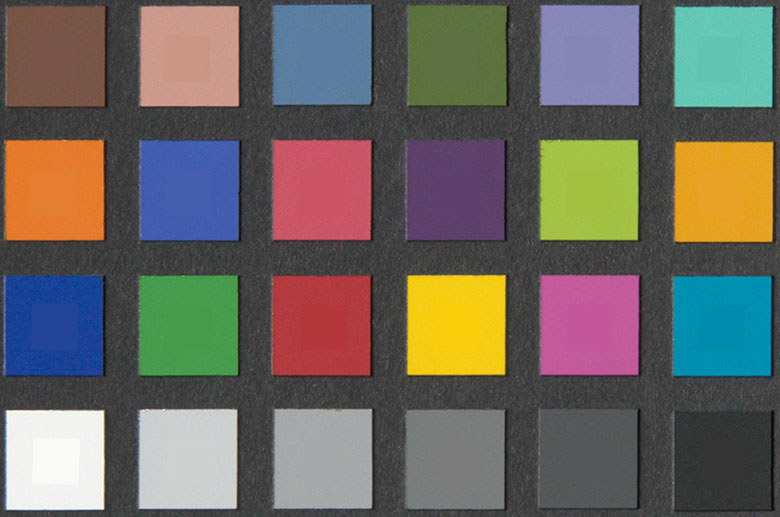
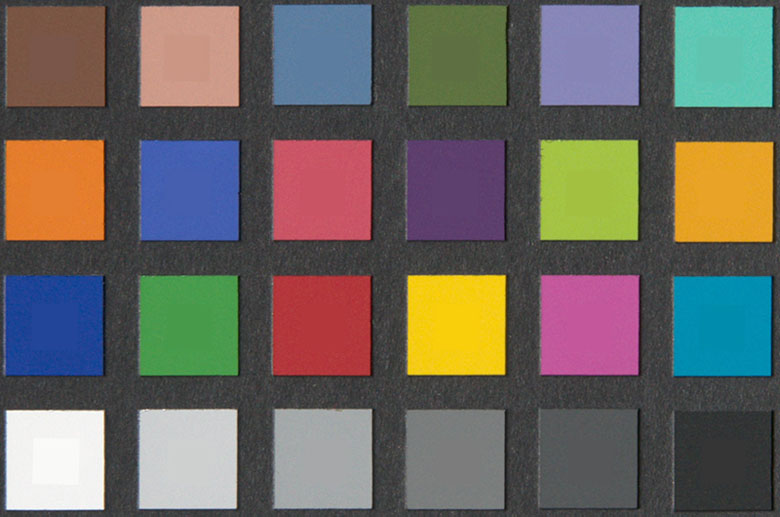
For faithfulness I mean the capability of a system to reproduce a color like it is in the real world. The process to reach this goal starts with a series of color patch (the Colorchecker 24 patch), measures them with a spectrophotometer and passes the spectral data to a software which provides the color values in a specific lighting condition (D50 condition in my case). When the ideal patches colors are defined, the user can edit the camera profile so that when the raw converter opens the target capture, it renders the color patches as near as possible to the ideal color values.
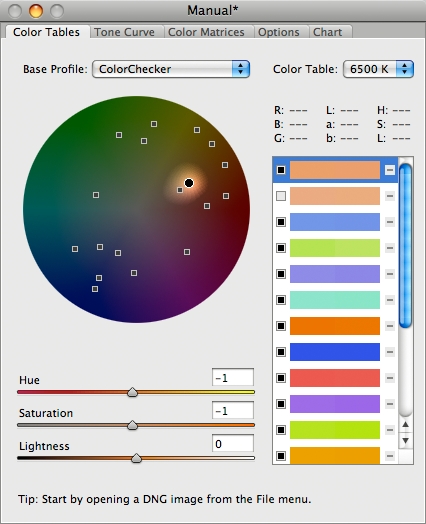
If the user wants to personalize the generic profile for his camera, the DNG Profile Editor offers two possibilities which he can be used separately, one or the other, or can even be used in synergy. The first possibility has already been proposed with the sliders of the Calibration Camera tab of Camera Raw and now those sliders are reported in the Color Matrices tab of module; this intervention tweaks linearly the global response of the profile. The second possibility is represented by the new HSL 2.5D tables in the Color Tables tab of the module. These tables, contrary to the calibration, tweak only selective areas of the profile. The interventions change the chromaticity (Hue + Saturation) of profile zones which can be defined by the user. For my purpose I used both available tables for the reference illuminants so that the resulting profile keeps validity in all standard lighting condition. As rule of thumb the calibration intervenes before the HSL tables. Together with the two HSL 2.5D tables a DNG profile contains a HSL 3D table. This table doesn't tweak the chromaticity but tweaks the real color of a sample (Hue + Saturation + Luminosity), but for now the access to the table is limited to Adobe.
With the release of the new DNG Profile Editor someone could wonder: “Is the calibration process obsolete?”. This is a critical point. Both calibration and HSL tables are implemented with the same purpose: tweak the profile with regard to a particular requirement: in our case the research of color accuracy. But, if the intent is the same, the way they work makes a big difference. Normally from a colorimetrical point of view a profile has zones that are right and other which are wrong at different level of gravity. The calibration, tweaking the chromaticity coordinates of the primaries, make a sort of global trade off of the error on all sectors of a profile. At the end, there isn't a big error in any part of the profile, but zones that before were correct, after the intervention can be a little less right. These zones are (a little) sacrificed in favour of those areas that had some fault. This is the drawback of the process. HSL tables are conceptually the exact opposite: they don't make global balancing, but take confined zones and stretch them where the user wants to drive them, and leaving not modified the other sectors. If on one hand the pro is the possibility of fine tuning only where the user effectively wants without the fear of altering anything else, on the other hand, the tables have some limits:
Summing up, if you want to use the tables it is worth to: 1. limit the number of the samples (max 18-20) 2. leave distance between the samples 3. avoid resolute intervention 4. avoid the use of Lightness slider.
After these considerations, I started from an old type profile, where the said maquillages are not already implemented. In fact the profile ACR 4.4 contains only the characterization matrices and its purpose is the colorimetric reconstruction of the captured scene. I intervened with a first important reduction of the error on all profile sectors with the calibration process on a target capture at 5000K; then with other two shots close to the reference conditions (2856K and 6500K) I automatically calculated in the Chart tab the two HSL 2.5 tables and finally I manually fine tuned the table at 6500K searching for matching the ideal color values at 5000K and containing the table intervention to avoid the collateral effects. The choice of this lighting condition for the calibration process (5000K) comes from a previous experience where I saw that the optimization of the sliders at 5000K was reflected in a faithful boost in all lighting conditions. This means that the tables have to do less work to reach the same goal, and the probability to introduce posterization in the images decreases. To sum up, using the calibration at 5000K before using the tables has two benefits: 1. the profile offers color accuracy in all sectors (even faraway from the samples used in the tables) 2. the profile keeps smoothness in the tonal transitions.
I used Photoshop CS4 and ACR 5.4 on Mac OS X Leopard and the version beta 2 of DNG Profile Editor. I used a spectrophotometer X-rite Eye-One Pro to measure the target, a Mini Colorchecker 24 patch, and Patch Tool by BabelColor to calculate the ideal color values of the target in Lab and RGB Prophoto mode. With RGB values I replaced the generic target values in the calibration script. For the calibration I used the unsurpassed script of Tindemans. Careful and reliable, it needs only some suggestions in the setting of the Base tab before the launch. For this reason I suggest to launch it more times, to set the Base and Calibration tabs with the values read in the final status window before the next launch. With the spectrophotometer I searched even the lighting condition close to the reference values, waiting for the right moment after the sunset and controlling the tungsten lamps. In order to evaluate the numerical and visual deviations between the ideal colors and the colors rendered by ACR, I used the optimum script Read_Colors_CC24 by Rags Gardner. This script, which is able to deal with measurement data files in X-rite format, in few instants returns an accurate report and renders on every patch the ideal color value. The interesting parameters for my work are the deltaE 2000 indexes which give an idea of the visual differences between colors and the indexes which resolve the error in HSB components (tint, saturation, brightness). The tint errors are less tolerated by a standard observer than the differences of saturation or brightness.
Everyone can reach good results because only the Colorchecker is essential. It's obvious that it is impossible to reach so precise numerical results, but it's not assured that you can assess in the images the improvements going towards extreme tolerances. In particular, the lack of the spectrophotometer for the measurement of the target or of the light could appear a problem. Actually: 1. the Colorcheckers, even not properly identical, are constructed within a good tolerance 2. calibration process is even a global trade off so that the custom color values are important but not too much. 3. to validate the lighting condition it's possible to use the WB eyedropper of ACR, it's enough to make a click on D2 patch and to read the estimated Kelvin temperature which for this purpose has a sufficient degree of accuracy. 4. the tolerances regarding the reference lighting condition are important but not so close: for the 6500K shot there is more tolerance (500/600K), less for the 2856K shot (100/150K), but the common tungsten 100W lamps should be enough. Sometimes on catalogues you can find the color temperature (CCT) of the lamps. 5. To reach the 5000K you can wait for the central hours of a non winter day, the important factor is that the atmosphere must be very clear.
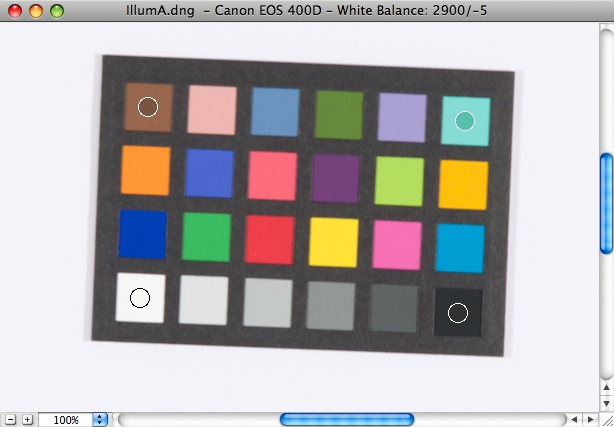
For the target capture I followed the rules described in a previous article: • lighting at 45°
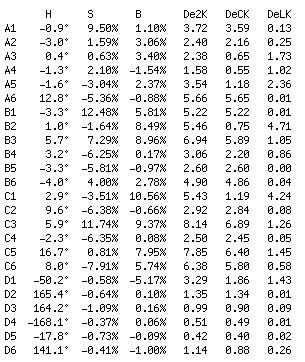
I opened the 5000K target capture in ACR, I chose the 4.4 profile in the Calibration tab, I set the Base tab and I left all other cursors to zero.
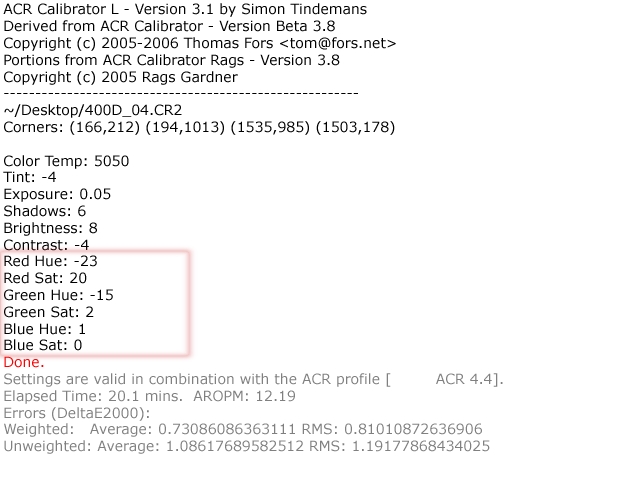
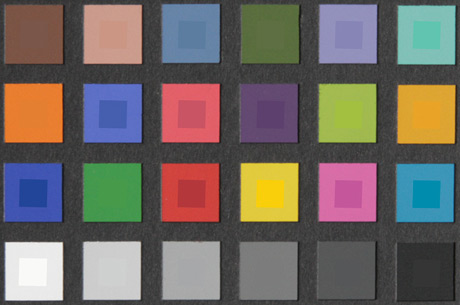
The profile ACR 4.4 offers an average deltaE 2000 error of 2.4 and a maximum of 5.7 in the Red patch.
The HSB indexes shows several tint errors which overtake the 10 degrees, a generic lack of saturation with peak of 7%, minor and less important errors in the brightness
The calibration script is a small program which opens the target in PS several times with different sliders setting, measures every time the patch and searches the sliders setting which gets the patch color as close as possible to the ideal color values provided by the user. I have set the script for a "democratic " error correction:
P.S.: the screenshot is becoming from Windows 7 because at the moment of the trial the Tindemans script didn't work correctly on the Mac with PS CS4 and I used a virtual machine and PS CS3. After same runs:
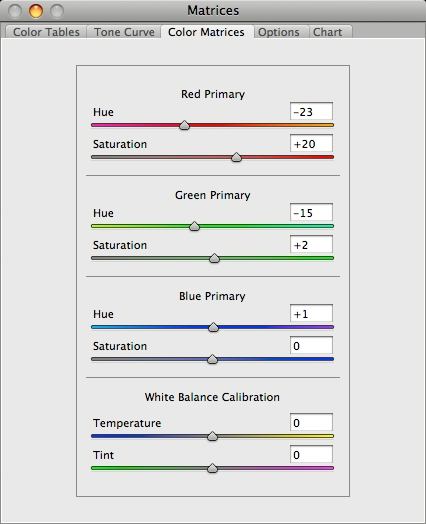
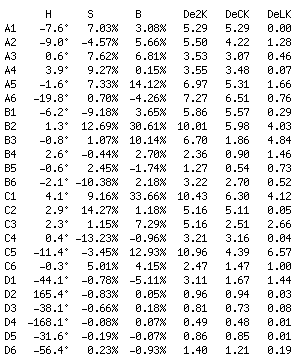
The final status window shows the intervention on red and green primaries, in particular the red has been moved in the hue and in the saturation.
Visually the improvements are immediately clear.
The HSB indexes confirm the visual improvements: the tint error is lower by one third, from beyond 10° at 3.4°, the saturation is recovered and the maximum error is halved; the brightness errors were already small. The parameters are very good, nonetheless this report shows the limits of the calibration process. Actually, as already said, if the calibration has lowered all errors, the counter effect is the distribution of the residual error along all patches. Patches that before were wrong now they are good , but patches that before were right now they are a bit less right.
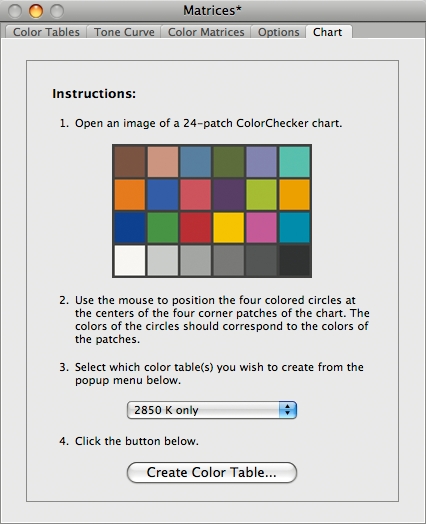
In the DNG Profile Editor, I opened the two target capture at 2856K and at 6500K (preventively converted in DNG format) and in Color Tables I chose the ACR 4.4 profile.
In the module I selected the right HSL table and click on Create Color Table.
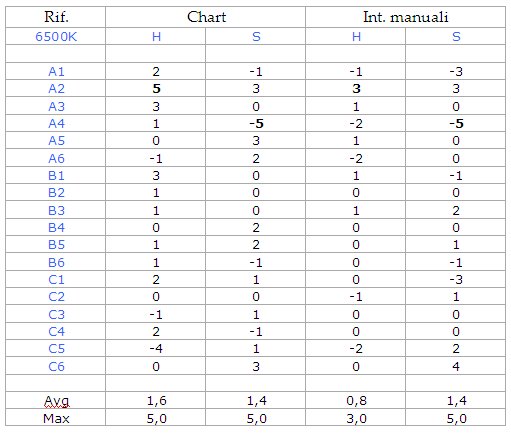
I followed the same procedure for the target captured in daylight. At the end in the Color Tables tab I found all samples and the relevant interventions calculated by module Chart in conformity with the color values of ColorChecker that Adobe gave to it. In particular the tab shows the positions of the color samples and the relevant corrections on the chromatic wheel. Below the sliders show the type and the entity of the interventions.
The Chart work: .
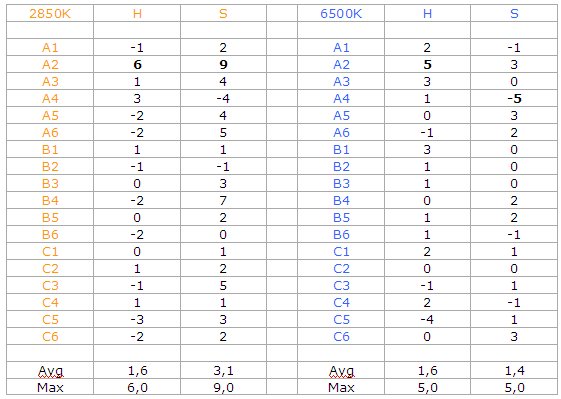
The table above reports the interventions calculated by Chart and, as noted visually, these are even numerically limited. In the Hue column the peak is just on white skin, as I expected, with a +6 at 2856K (this is a difficult table) and even less at 6500K. In the saturation column the peak is still in the tungsten table and on the white skin patch with +9, in the daylight column the maximum is only +5. There are several fields close to zero. This result means several things, that my shots are correct, that the calibration drove the patches in a position where the Chart find them correct and finally that my custom ColorCheker values are not so different from those in the hands of Adobe. At this point I exported my new profile in the ACR camera profiles folder.
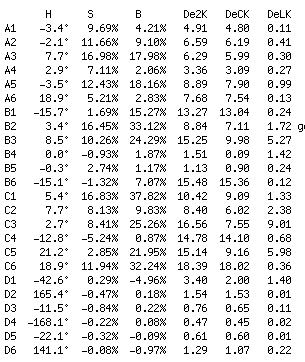
I opened the target image at 5000K in ACR and in the Calibration tab I chose the new DNG profile getting all fields to zero.
The average and maximum errors are only a bit worse.
Some indexes are improved, some got worse probably for the generic values of the target. The hue of the white skin is now correct but the correction has involved damage to the dark skin which now is the worse error in the tint and in the saturation column.
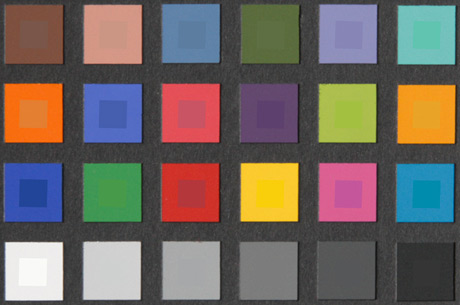
As said, the error of the white skin was corrected but with detriment of the dark skin. Here is the limit of the new solution: the tables do not intervene on the color sample but on its chromaticity, which is the color minus the lightness. This means that very visually different patches, like the white and the dark skin, are considered by the module too much similar because they differ mainly for the lightness. And this means that an intervention on a sample involves the near sample. Here the user should take care because probably he might introduce damage in the profile if he looks for the absolute color precision. The danger is even higher if the two patches need opposite interventions like in this case. This is valid for the hue and even for the saturation; in fact a patch needs more saturation and another less saturation, so on the chromaticity wheel we have to move the internal sample toward the external patch and vice versa, with an always more compressed zone and consequently an higher probability of introduce rough in the profile and posterisation in the images. For this reason it's better to limit the interventions on close patches. Remember however that the error indexes are already excellent taking into account the human vision tolerance. The graph below shows the zone of influence of the intervention of the dark skin that involves the white skin sample (deactivated for the demonstration).
For the manual work I started to fine tuning the hue sliders and at the end I worked with the saturation ones. After some passes I stopped.
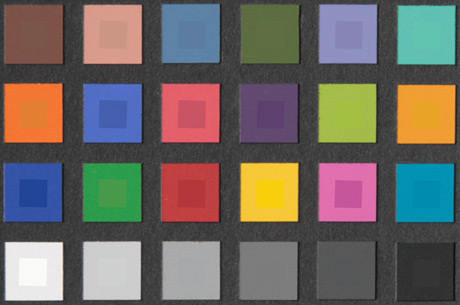
The average error has become 0.7 and the maximum is 1.3.
Below the final manual interventions in the 6500K table are shown.
On many patches to get close to color value read by spectrophotometer I reduced the automatic Chart intervention (you can see the average index). For the white and black skin I found a compromise. Many fields now are at zero and this is a confirmation of the goodness of the calibration which corrected properly the profile errors and avoided the use of the table. However, in consideration of the Chart results, I tweaked the tint and the saturation only by some units (Hue max 3, Sat max 4), this is one more evidence that the ColorChecker color values in the hand of Adobe are not so different from mine.
The DNG Profile Editor, after the incorporation of the calibration sliders, is a further important step in the customization of the camera profile and offers many opportunities. In my case, it permitted to obtain an excellent level in the color accuracy, but IMHO has still the following limits (in order of importance):
Last, I don't share the Adobe's choice to pension off the calibration script because the calibration and the table are very different and should be used in synergy in order to avoid unpleasant consequences. Good proofs! Thanks to Alessandro de Bertolini for his help in the English translation.
It will be confirmed the thesis that, at least for the colorimetric stuff, the proprietary raw converters produce better performance in comparison with those of third parties? For comparison I verified the color accuracy offered by the proprietary raw converter of Canon. DPP proposes five camera profiles and the user can’t customize or replace them. I analyzed them with the same method used for ACR: in DPP I have set the WB and the gray row close to the ideal values and then, after having transferred the file to PS, I analyzed them with the script to understand how the colors has been rendered comparing them to the ideal color values. Actually the five camera profiles are Picture Style, profiles where Canon has introduces some kind of maquillage to optimize them for the uses recalled by their names. But the Picture Style named Faithful doesn’t leave any doubt on Canon intent when it was created, the profile is voted to the color accuracy and to the colorimetric reconstruction of the scene. In fact, with this Pycture Style, the reports show the lowest deltaE 2000 average error. But the absolute performance, with a deltaE 2000 average error of 3.8 and a maximum of 8.4, is very close to others Picture Style and lower than the generic ACR 4.4 profile. The HSB columns show correct values together with rather wrong ones. In the hue column the error reaches 9 degrees, the fault in the saturation arrives at 10% but in general there are several patches with excessive brightness that exceed 10%. Always with the Faithful Picture Style the white skin hue error reaches 4 negative degrees, the Picture Style dedicated to portraits shows 9° negative.
The reproduction any part of this article is prohibited, without the author's permission. |