|
Stitching And Infrared I have been shooting landscapes for many years and the move to large format photography was in some sense to be expected. However, I have never been an Olympic athlete and as time goes by strength and fitness do not typically improve, at least for me! The need to be able to produce large scale images but with a relatively light setup moved some of my photography toward stitching (not all of it, I still go around with my 8x10 and 14x17 cameras). The fascination for infrared photography that I have carried from my 120 film years received a major boost with the advent of permanently IR-modified DSLRs. Stitching and IR photography got married soon thereafter: I consider the combination of the two quite compelling, and I plan to keep pursuing it. The picture I discuss here is a bit different from many others shown on the net. First, it challenged my computing resources because it consists of 287 frames taken with a Rebel XT permanently modified for digital IR photography. Let me make one thing clear: I am not competing in any race for the largest publicized stitched image (which, as of May 2007, amounted to 13G pixel, and I am sure has been by now surpassed by something even bigger). This image, that tops a humble 1G pixel count, shows also what one can do with a 2003 PC with 2G of memory (and 90GB of free hard disk to be used as temporary storage by the software). Most importantly though, these very large images of landscapes present a series of problems when stitching them that are seldom acknowledged and the solutions of which are even less known. Finally, the image has been taken in a less than convenient environment, to prove again the value of stitching as one of the many weapons in the photographer's arsenal. First of all, let me briefly describe the equipment used. The camera is a permanently IR-modified Canon Rebel XT. The lens is my favorite one for very large panoramas, i.e., a Nikon 105mm AIS, a lens well corrected for IR wavelength, quite compact and easy to carry around. The tripod is a carbon fiber Gitzo with a Really Right Stuff pano head. The head has angle steps marked both horizontally and along the vertical axis. Once one knows the horizontal and vertical angle of coverage of the lens being used and the necessary overlap between contigous frames it is possible to plan for a very fast shooting sequence, by never looking into the viewfinder while relying on the angles marked on the pano head. Using the remote cable with the right hand and moving the head with left hand makes it possible to shoot once a second along the horizontal axis. Rotating the lens along the vertical axis by the appropriate amount and moving back to where the sequence started takes another 10-15 seconds. At that point a new horizontal sequence can start. The reason I went into these apparently irrelevant details will become clear in a moment.
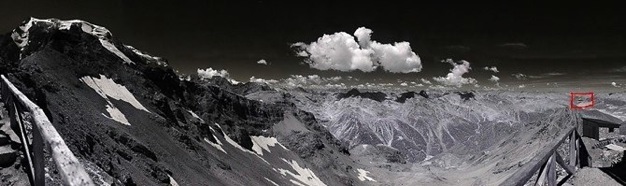
The image has been taken at 10,000 feet altitude in the Italian Alps. On the far left side there is the Ortles mountain, which almost tops 13,000 feet. The panorama includes several other lower mountains still in Italy, while on the far right there is Austria. The tiny lake that I have marked with a red square is still in Italy but the border with Austria is a few kilometers away. The image is a stitch of 287 frames and consists of 60,000 x 17,600 pixels. You figure out how big the wall in your house or apartment has to be to hang it on it. It is still in Adobe RGB to be able to experiments with false colors, so the file size is 3GB. The image shown here is of course a much reduced version, and I have applied only some sharpening and fixed the levels. The large image has undergone more extensive manipulation, including selective sharpening, curves, some noise reduction, and dodging and burning to fix some shadows that are blocked and deal with a few high-key areas. Given the size of the file and the power (or lack thereof) of my PC I was very patient... To show the resolution of the image I have included a 100% crop of the tiny lake (see the little red frame on the right side of the panorama) and it is shown below.
One can notice some noise on the surface of the lake that can certainly be reduced with one of the standard noise reduction software packages that are available. I am happy with Neat Image, for instance. Stitching pains The major challenge in the creation of this panorama has certainly been in the stitching together of the images. In fact, the thing that I am most proud of is that carrying all the gear to 10,000 feet has not been such a big deal. My 8x10 equipment would have been a different story, though. Anyway, back to stitching. The problem in stitching together very large panoramas is with anything large-scale that moves, like surface water or the sky. Clouds have this annoying passion for changing shape while frames are being captured, and up on the mountains things can get only worse. The result of this is a breakdown of the stitching software (at least of all the ones that I have tried) that creates objectionable blends between frames and literally invents very visible artifacts that indeed do not exist in the original image. It is clear that speeding up the shooting sequence leaves fewer opportunities to clouds to move around, but the problem does not go away. In this panorama, that consists of 7 strips of 41 pictures each, it takes (see the math above) a minute to go back to the first image at the beginning of the strip. Therefore, while clouds do not change their shape appreciably between two consecutive frames in the horizonal direction (they have been captured one second apart), in the vertical direction one picture and the one immediately below are separated by about one minute. And clouds do change a lot in one minute. Hence the artifacts (very objectionable puffy and foggy white spots in the sky) that the stitching software introduces by trying to blend two images that are structurally too different. If you go look at these artifacts in the skies of the very large panoramas that compete on the net for the "largest picture of the week trophy" you will likely spot them with ease. It is fair to say that nobody is interested in printing such images and the competition has more to do with information technology than with fine art photography, but the white puffy spots in the sky are there, no question about it. Lastly, these gross mismatches between nearby images (in the vertical direction, that is) create havoc into the stitching software, that deforms entire strips in the outward or inward direction to compensate. To make a long story short, the image resulting from the direct stitching of the 287 frames turned out to be unusable. The image has been generated by my current stitching software, i.e., PTGui. This is an exceptionally good application, considered by many to be the best around right now. The stitching of this image took about 14 hours (wall-clock time) on my old PC. This did not give me a lot of opportunity to experiment with different ways to work around the problem of stitching the sky that I explained above, but I did try a few without any success. Eventually I gave up and decided that a new approach was necessary: using good old “divide and conquer” I stitched together all immovable objects first and then took care of the sky. I used PTGui to put together the whole image consisting solely of frames that had at least some small still object in it. That resulted in an image of all the mountains ranges and some portion of the sky. I then generated three strips of sky from the original frames going from the peaks of the mountains to the top of the final image. I will not go into details here but PTGui could not be used and I went back to a stitching software I used a few years ago, Panavue. This software is less powerful and sophisticated than PTGui but offers total manual control on stitching with a simpler, faster user interface than that of PTGui. Once I generated the three strips of sky I opened Photoshop and layered the four images together (i.e., that of the mountain ranges and the three strips of sky), blended them together, and removed a few more artifacts. After about 60 hours of serious work and two months into the project I had my image ready to be fine tuned. After that I have to figure out how to print it without breaking my piggy-bank. Luckily, the ancient and beautiful large scale Japanese screens provides excellent ideas on how to mount and display such monster picture! Finally, in a small site of mine devoted to infrared photography, there is a section on very large images. There I have used Zoomify to show these very large images, a fun tool to use (just be a bit patient if your connection is not fast enough). One of these images is indeed the one presented here, shown in its "false color" version. Kanpai! (c) 2008 Marco Annaratone, all rights reserved |